Comment

Half Square Triangles

How many options are there with a two color half square triangles?
Think about this...you are going to make 50 half square triangles and put them into a quilt.
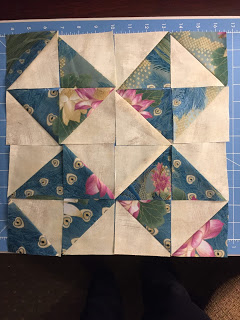
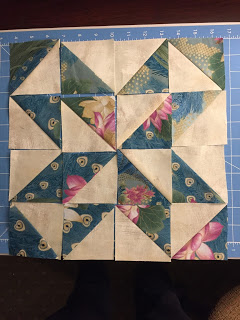
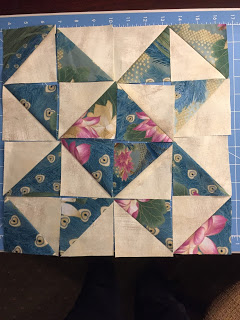
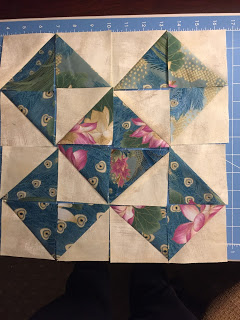
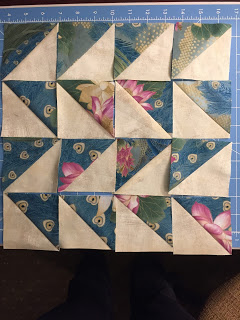
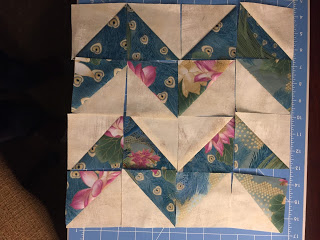
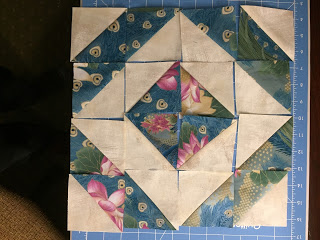
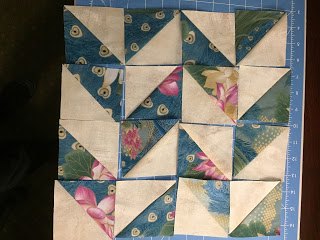
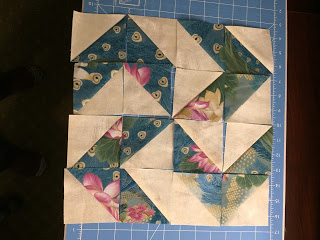
What are the options when rearranging the squares to make a block?

I've taken 16 half square triangles and rearrange all 16 to make these blocks.  There are many more options. What can you come up with?

It's like playing with a puzzle.

Have fun and happy quilting,
Denise

Comment

Comment

Thread Types and Weights

Ask yourself what you want to see- Quilting, Stitching or the Piecing

12 wt.

  • Heaviest for machine quilting
  • Larger needle 110-120 (on long arm machine)
  • 90/14 needle on home sewing machine
  • Stays on top of quilt

30 & 40 wt. –long staple important for quilting

  • Most used thread weight for quilting on top
  • Needle size 100-110, 
    • 90/14 needle on home sewing machine
    • Stays on top of quilt

50 & 60 wt. bobbin weight

  • Common size for bobbin weight thread
  • Lays in the fabric more that heavier weight threads
  • If you have a thread that does not like to go in a needle use it for bobbin
    • •Mark spool only for bobbin
    • •Why does thread break??
      • 8/12 needle on home sewing machine
      • Stays on top of quilt

100-50 wt. goes into the fabric

  • Piecing with 50 wt.
  • Micro quilting with light weight
    • 90/14 long arm needle
    • 75/11 or 80/12 needle on home sewing machine
    • Stays on top of quilt

Comment

1 Comment

Free Motion Frenzy Class - Loading Leaders

During the past month I have taught my Free Motion Frenzy class three times.  Each time it has been taught you have asked for the information to be put out somewhere for you to download.  So, since you asked here you go.  Some of the files were posted earlier on the blog for you to download.  Go to the search engine and type in what you are looking for such as batting or Momentum Frame.  The less you put in the search engine space the better.

You can also add your email address to subscribe and get notification that I have posted.  Following on Facebook will give you inspiration or ideas for future projects.


 Attaching leaders on most quilting frames is the same across the board. My suggestion is that you add a red stitch line to the center of each leader.  This helps when loading and keeping things straight.

Thanks for attending class and have a safe and happy holiday.
Denise

1 Comment

Purse Handles

After teaching today my students asked about making different purse handles so I thought this would be a good opportunity to post a few links on making handles.
 

The first on in my list below are my favorite way to do my handles.
I am sure that you will pick one to make that will become your favorite. 
http://sewmodernbags.com/how-to-make-bag-handles-with-plastic-tubing-video/ 

http://makezine.com/2015/03/20/make-your-own-perfect-fabric-purse-handles/

http://www.sewcanshe.com/blog/2016/9/10/diy-clip-on-tote-bag-handles-free-tutorial

http://juniperplaceyarns.blogspot.com/2012/04/diy-purse-handles.html

http://www.sewcanshe.com/blog/2013/8/5/making-faux-leather-bag-handles

http://thesewingloftblog.com/rolled-handbag-handles/

Hope this helps to finish your bag off with style!

Happy Stitching,
Denise

Needle Know How

How important is a needle in your sewing world?  For my world it is the point in my stitching that get the job done.  

Learn more about needles with my friend. Rhonda. just watch his video and see more.

Needle education with Rhonda

Here are a few digital articles that I found very educational so I thought I'd share. them with you.  

schmetz digital-magazines

Happy. Sewing,

Denise

Comment

Caring for your Quilts... How do that?

A questions that is always coming up is about how to care for quilts.  This give me a great opportunity to give some suggestions and advice on what my thoughts are.
Here's my thoughts: Laundry detergents and Woolite are to harsh for quilts of any age.  At my home we us a product called Orvus Quilt Soap.  I purchase it from my local quilt shop. 
It's really a detergent, not a soap, made of 100% sodium lauryl sulfate, with a neutral pH that is completely biodegradable.
The most important about a information is that it contains no: 

  • Optical brighteners which are really poor wash-fast fluorescent dyes (that means they wash out easily) that transform invisible ultraviolet light to make fabric colors appear brighter.
  • Fabric softeners which can leave behind a residue on fabric that attracts dirt and oils.
  • Fragrances
  • Enzymes

One of its best features is that you know exactly what is and isn't in Orvus and what it is.
Though similar chemically, detergents and soaps are different. Soaps are made from animal or vegetable fat and oils which are then mixed with a strong alkali. Detergents are created from petro-chemicals.

Below are a few websites with information on caring for your quilts.  

http://museum.msu.edu/glqc/quiltcare.html
http://www.allpeoplequilt.com/how-to-quilt/quilting-basics/caring-your-quilts
http://www.si.edu/Encyclopedia_SI/nmah/vicquilt.htm

Last I would like to tell you about what I do with regards to quilts thatI give as gifts.

  1. Label
  2. Give quilt with a card that describes best practices for caring for your new quilt. 
  3. Also let the person know the quilt is made for loving, holding cuddling and washing is allowed. 
  4. Include a bottle of quilt soap with each quilt. 

Happy Quilting,
Denise 

Comment

Comment

Embroidery Stabilizers

There are so many stabilizers for you to choose from that it makes it hard to select the right one for the job.  Below are a few links to education sites and documents about keeping things stable. 

My favorite stabilizers are the following:
These can be purchased from many different companies.  
Cut Away - Whitefor sweatshirts
Cut Away Black for dark fabrics
No Show Fusible Mesh - this is great for t-shirts and quilting blocks
Tear Away Wash Away - another stabilizer good for quilting
Clear Wash Away - towels and anything needing a topper
Aqua Wash Away - the best for lace


Happy Stitching,
Denise 

Comment

Comment

Getting Organized in your Studio

Some of you have asked for tips on how to get organized in your sewing room/studio.  So, it's seems to me that we all need help with this.  Let me show you some of my favorite ways that I keep thing in there place and what helps me. 

Hanging the batting from the basement ceiling works very well at my home.  Not all of you have a basement and this is not something you could do.  Here's a thought maybe you have a garage, storage closet or a place that it could be hung.  Hanging from the ceiling doesn't take up floor space.

We used the extra poles for my long arm frames to hang the batting on.  The poles are hung with straps that you can get at the local hardware store. Then I went to my closet and selected a few belts that I no longer can wear (or fit in). These belts became a strap to hold the batting from unrolling it's self which one bold did entirely on the floor.

Four bin hamper for organizing scrapes.  I could not live with out this device in my studo.

Each bin is labeled for what goes in the hamper. Batting, batiks, regular fabric and strips are how I sort each compartment. 

Serger thread sorted by color on a peg board has been attached to an unfinished wall in the basement.  When you need 4 or more spools of each color it is nice to see what colors you have and the ability to get to them helps also. 

Under the long arm frame is a large amount of dead space.  After taking a few measurements I started researching for drawer units with wheels.  These fit perfect and I purchased four from Ikea. This frame is 12 foot.

Here's the information about the units and a link to help you with more details about the drawers.


ALEX
Drawer unit on casters, white

$119.00
Article Number: 
401.962.41
Drawer stops prevent the drawer from being pulled out too far.
Size
26 3/8x26 "
http://www.ikea.com/us/en/catalog/products/40196241/

Under my 10 foot Momentum Frame I have added a shelving unit with fabric drawers.  This works well for scrapes, stabilizers, yarn, project and sew much more!  These units were purchased at Target.  They are made to stand up.  By putting them on their sides they were perfect for this frame and the space that I had. 


Watch for more ways to help you get organize!

Happy Quilting, 
Denise

Comment

Birthing a Quilt

The first time I ever made a quilt I was shown how to birth it.  At that time is was very common to do.  
Finishing a project without binding is simplified with inside-out method for making a quilt sandwich, sometimes also called you may have heard it called “Birthing”.  
Cut the backing 2” longer than the top.  Take backing but in half. Place right sides together. Using 2 pins mark a 4” space along the width of the backing. Seam the edge using 2.0 stitch length and ½” seam allowance.  Press to one side (not open).
Next place the top on the backing right sides together.  Place the batting on the wrong side of the top. Stitch around the entire quilt.  Turn the quilt through the hole that was created in the middle of the backing.  Trim corners to remove excess fabric.  Use a corner turner to push the fabric to a point at each corner. Press and quilt as desired. 
The below project is a small wall hanging that works well for a first project to try this technique on. 

1 Comment

Tips for loading on the Momentum frame by baby lock

These tips are some that I have found useful when quilting on the baby lock Crown Jewel II on the Momentum frame.  You may find these useful for you also if you are on the Momentum frame or another.


Momentum frame:

1.       Leaders

a.       18-20” is used on the take up rail
b.      9”is used on the backing rail
c.       26-27” is used on the top rail

2.       Loading leaders from the back for the take up rail

a.       Easier reach
b.      Better visibility
c.       Keep things straight

3.       Load take up rail first

a.       Using pin (t or hat pins work best)
b.    Pin with two pins on the end going opposite direction for better security

If the Velcro is stitch on the back you may need to fold it over and re-stitch it in place.  This will help when rolling.  It will keep the leader from having a fold that does not always lay correctly.

If the Velcro is stitch on the back you may need to fold it over and re-stitch it in place.  This will help when rolling.  It will keep the leader from having a fold that does not always lay correctly.

You may need to do the 1st step for all three leaders.

You may need to do the 1st step for all three leaders.

Mark the center of each leader using a fabric pen.

Mark the center of each leader using a fabric pen.

Wind a bobbin in red and using the same red thread on the top stitch on the line you have just drawn. Straight stitch with small stitches works best.

Wind a bobbin in red and using the same red thread on the top stitch on the line you have just drawn. Straight stitch with small stitches works best.

Above is what your results should look like when you finish stitching each leader.

Above is what your results should look like when you finish stitching each leader.

You may need a friend for this step.  They can help you hold the tape measure.  Or you can hold in place with painters tape.  Measure each frame rail.  Mark center.  We used blue painters tape on the store frame.  At ho…

You may need a friend for this step.  They can help you hold the tape measure.  Or you can hold in place with painters tape.  Measure each frame rail.  Mark center.  We used blue painters tape on the store frame.  At home I used a fine line Sharpie red marker.

Shop frame showing the painters tape with center line marked.

Shop frame showing the painters tape with center line marked.

With leader removed from frame pin backing to leaders. Once you have completed the pinning take the pieces to the frame.  Line up the center of take up rail with center of 18" leader. Repeat on the backing rail with the 9" leader.

With leader removed from frame pin backing to leaders. Once you have completed the pinning take the pieces to the frame.  Line up the center of take up rail with center of 18" leader. Repeat on the backing rail with the 9" leader.

Remember to send the fabric or leader through the opening of the dead rail. Fabric will be sandwiched between the two pieces of the dead bar.

Remember to send the fabric or leader through the opening of the dead rail. Fabric will be sandwiched between the two pieces of the dead bar.

Visual of the fabric and leader between the dead bar.

Visual of the fabric and leader between the dead bar.

Secure both leader pieces to the bars with the Velcro.

Secure both leader pieces to the bars with the Velcro.

You may find it easier to secure the leaders to the take up bar from the rear of the frame.

You may find it easier to secure the leaders to the take up bar from the rear of the frame.

Open dead bar image. Showing how the leader will look in the dead bar.

Open dead bar image. Showing how the leader will look in the dead bar.

Notice the leader is about half above the bar and below the bar. I tend to like more above the bar due to the 180 degree rotation of the bar once it is closed.

Notice the leader is about half above the bar and below the bar. I tend to like more above the bar due to the 180 degree rotation of the bar once it is closed.

Close up of the locking mechanism on the Momentum frame. Black lock with silver pin will lock in place to close.

Close up of the locking mechanism on the Momentum frame. Black lock with silver pin will lock in place to close.

Start rolling and smooth as you go.

Start rolling and smooth as you go.

Continue until all backing has been loaded on the frame.  Keep the locks open once you start.  Note:The rails will only roll the correct way if the frame has been put together correct.

Continue until all backing has been loaded on the frame.  Keep the locks open once you start.  Note:The rails will only roll the correct way if the frame has been put together correct.

Once the backing is rolled you can then go back to the take up rail and the dead rail to complete the process.  Do the final roll and tension on the fabric with the locks unlocked.

Once the backing is rolled you can then go back to the take up rail and the dead rail to complete the process.  Do the final roll and tension on the fabric with the locks unlocked.

Dead rail is rolled 180 degree.  This process is how the frame will keep tension on the quilt as you quilt.

Dead rail is rolled 180 degree.  This process is how the frame will keep tension on the quilt as you quilt.

Baste the top of the quilt to the backing and batting. Repeat pinning to the leaders with the top of the quilt.

Baste the top of the quilt to the backing and batting. Repeat pinning to the leaders with the top of the quilt.

Roll unless you like to float your top and batting.

Roll unless you like to float your top and batting.

Do the happy dance your are ready to quilt!

Do the happy dance your are ready to quilt!


Happy Quilting,
Denise

1 Comment

Comment

True Type Fonts

In my sewing and quilting world it seems like I am always using a computer.  Its a good thing that I like my computer.  We have a very special relationship and understanding.  Because of this I'm always trying new things.  True Type Fonts are one of my favorite things to try with my computer and sewing world.

So now that you are wondering how can a true type font be used in our sewing studios, let me show you a few ideas of how to use truetype fonts.

Fabric cut using truetype fonts

Fabric cut using truetype fonts


Embroidery or quilting designs can be easily digitized with truetype fonts.

Quilt labels take on a new look with a font that tells a story.
Applique text with so many choices you won't have an easy job of selecting which one to use
During a class that I was teaching the students were making a "Welcome to our Home" wallhanging and we created this using truetype fonts.  The 1st font on the list is a very elegant font that works perfect for you to cut with the Cameo by Silhouette.
 

Vinyl cut letters from a truetype font

Vinyl cut letters from a truetype font

Special saying in my sewing studio with vinyl letters

Special saying in my sewing studio with vinyl letters

Inspirational words on my ironing station

Inspirational words on my ironing station

ILS Script http://www.freepremiumfonts.com/top/top50.aspx

Calligraphy http://www.1001freefonts.com/ - I really like the calligraphy fonts
Elegant http://www.downloadfreefonts.com/ - The Chopin Script is very beautiful
Just plain fun http://www.fonts2u.com/category.html?id=37 - The art font is one that I can not live without.
Hibiscus flowers http://www.pickafont.com/fonts/Hawaiian%20Quilt3.html Quilt 1, 2 & 3
Snowflakes http://www.dafont.com/theme.php?cat=804 Be sure to download the snowflake font
Butterfly Truetype Font: http://www.typadelic.com/butterflies.html

Artist Script http://fontzone.net/font-theme/script/?pg=2
Cartoon Animals http://www.fontriver.com/font/lm_animal_toons/ 
Ice and Snow http://www.fontpalace.com/font-category/Ice-Snow+FontsFlowers http://www.photoshoproadmap.com/fonts/family/Kalocsai-Flowers/

Happy cut, sew and quilting, 
Denise

Comment